How to Make a Music Video with AI: A 4-Step Guide Using Suno, GPT Image, and Kling
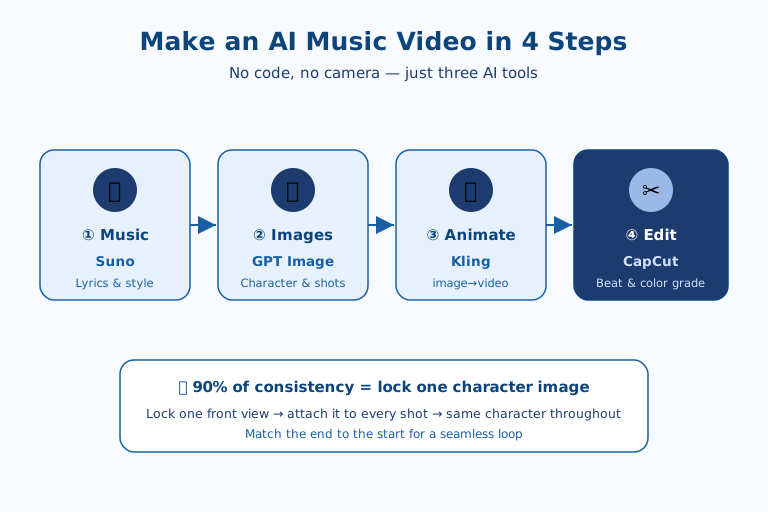
With no code and no camera, just three AI tools, you can make an animated music video. The song comes from Suno, the artwork from GPT Image, the animation from Kling, and the editing from CapCut, all in four steps: (1) make the music, (2) create character and shot images, (3) animate with Kling, and (4) edit in CapCut. The key is to "lock in a single character image to keep things consistent," so that even as the shots change, the same character and the same mood carry through.
1. Why Build It as a "Pipeline"
An AI music video is built on a pipeline of "music → images → animation → editing." Each stage has its own tool that does the job well, and stitching them together produces a finished piece.
There is a reason you split the work into four tools instead of trying to do it all in one. Today's generative AI is still weak at doing the whole process in a single pass. The model that writes a good song is not the same as the one that draws a stable character, which is not the same as the one that moves that image naturally. So the work has to be broken into pieces you can control independently, so that when one part goes wrong, you can rerun only that stage. If the music misses, redo just Suno; if a face smears, redo just that Kling shot. This modularity is what separates a beginner's real working speed from an expert's.
Here is what you'll need.
- Suno — generates the song from just lyrics and a style (music)
- GPT Image (ChatGPT) — character and scene keyframes (still images)
- Kling — turns still images into video (image-to-video)
- CapCut — connecting shots, subtitles, color grading, and exporting
2. STEP 1 — Making the Music with Suno
First, enter a "style" and "lyrics" into Suno's custom mode to generate the song. For the style, put in the genre, mood, and BPM; for the lyrics, add structure tags like [Verse] and [Chorus]. For example, you might write the following.
[Style] dreamy summer citypop, airy female vocal, warm synths, 92 BPM
[Lyrics]
[Verse] ...
[Chorus] ...
For Reels, keep it short at 35–45 seconds, and to make captioning and editing easier, get a separate instrumental version as well. Generate several songs and pick the one with the most addictive hook.
There is a reason the music comes first. The song's BPM and hook placement determine the number of shots and the transition timing in every later stage. At 92 BPM, one bar is roughly 2.6 seconds, and a 5-second shot spans about two bars. In other words, once the music is locked, you can work backward to figure out how many shots you need, which keeps you from wasting effort in the image and animation stages.
3. STEP 2 — Creating Characters and Shots with GPT Image
This is where 90% of your video's consistency is decided. Lock in a single character image (front view) first, and then build every subsequent shot based on that image so the character doesn't drift. Write the character description exactly the same way every time.
front-facing full body, [hair / outfit / expression] fixed, simple background, authentic Japanese anime 2D cel style,
not overly idealized, no text, vertical 9:16
Attach your finalized character image to a new prompt and generate each shot with "this exact character, but this time [scene]." Generate 2–3 images per shot and pick the best one.
4. STEP 3 — Animating with Kling
Feed the still images into Kling's image-to-video to make a 5-second clip per shot. For motion, keep camera moves (push-in, pan, tilt) and character actions concise, and add phrasing to prevent morphing (faces smearing).
[Motion] slow push-in, hair sways in the breeze, subtle, cinematic
[Negative] morphing, distortion, deformed face, flickering
If faces changing is a concern, register the front-view image in Kling's element (character) registration so the same face is maintained across shots. When you want to connect shots smoothly, use the last frame of the previous shot as the start of the next.
5. STEP 4 — Editing and Finishing in CapCut
Finally, load the video clips and music into CapCut and weave them into a single piece. Turn on beat detection and sync your cuts to the beat to bring out the rhythm, and place your climax shots on the chorus for maximum impact.
Finish in the following order.
- Apply the same color-grading filter to every clip (unifying the tone, the key thing that separates amateur from pro)
- Keep subtitles to a minimum (one line for the hook if needed) and lock the watermark in place
- Match the end to the beginning for an infinite loop (boosts replay rate)
- Export at 1080×1920 (9:16), 30fps or higher
6. How to Apply This to Your Own Channel
The four steps above are only a skeleton; when you actually use this on a channel, a few things need to be tuned to your own situation.
The first thing to decide is how many shots to put in a single Reel. For a Reel of about 40 seconds, roughly 8 shots at 5 seconds each is a comfortable length. Adding more shots makes the screen busier, but the cost of Kling animation and per-shot regeneration rises accordingly. So at first it is more efficient to keep the shot count minimal and place your most polished shot in the first 3 seconds, where the hook lands.
The next mindset is building "reusable assets." A finalized front-view character image and a color-grading preset do not end with one video. If you keep making the next video, and the one after that, with the same character, the whole channel ties together into a single world, and that is what makes subscribers recognize it as "this creator's content" as a branding asset. In other words, the work of locking in a character for the first video is not a cost for that one video but an investment in the whole channel.
7. What This Means for Creators
The real significance of this pipeline is the collapse of the barrier to entry. Animated music videos used to require the staff and budget for drawing, shooting, and editing. Now an individual can produce the same result on a single laptop. The axis of competition has shifted from "capital and manpower" to "planning and consistency."
But a paradox follows: the more the tools are leveled, the more the outputs start to look alike. When everyone uses Suno, GPT Image, and Kling, the remaining edge is not the tools but the planning and taste of "what to make." Repeating only common styles like authentic Japanese anime cel work makes it easy to get buried by the algorithm. The creator who locks in their own character, color, and theme and exposes it repeatedly ends up ahead in reach. City-pop and ballad styles carrying local lyrics and sensibilities are still a long-tail area with little supply through this method, leaving room for early movers to stake a claim.
8. Limits and a Sober Check
To set expectations accurately, it is worth naming the limits of this method.
First, character consistency is a matter of "management," not "perfection." Even with character registration and a fixed front view, faces can shift subtly on large-motion or rotation shots. That is exactly why this guide repeatedly recommends subtle motion and a fixed camera, and it also means your freedom of expression is constrained to that degree.
Second, reproducibility is low. The same prompt yields slightly different results each time, so the process of generating 2–3 images per shot and picking is essential. This "generate and discard" cost accumulates as your output grows.
Third, copyright and commercial-use terms must be checked directly against each tool's policy. In particular, the scope of commercial use for songs made with Suno and images made with GPT Image can vary by plan and terms of service, so if you have monetization in mind, it is safer to confirm before posting.
Despite these limits, the value of this method lies less in the quality of the finished piece than in the speed to completion and its repeatability. It doesn't have to be perfect from the start. Once you take a short 8-shot loop all the way to completion, the next one will go much faster. The key to raising your production quality isn't tricks, it's consistency, and if you unify the character, color grading, and world-building, even with different shots it will look like a single cohesive work, which is what creates the impression that it was "well made." Posting the same video to Reels, TikTok, and Shorts together can multiply your reach several times over.
References: Suno · Kling AI · Claude Code Official Docs

AI & tech,
read in depth
Beyond the headlines — into the context and the structure
AGI Soon As Possible · asapai.co.kr